Pages

Wednesday, December 17, 2014

Christmas Mantle

So when it was time to decorate for Christmas this year I had two things I was looking for and they both involved my mantle. First on the list was stockings! With the new addition of little Gracie Lu this year, our family was in need of proper stockings for Santa to deliver all of the goodies. When you see these stockings you will know why they were right for me! Can you say personalized monograms?


Tiny Prints just released stockings this year and after looking through all of their fun options I knew a neutral monogrammed stocking was the perfect fit for our family. They are a gorgeous linen fabric with a printed monogram and a subtle snowflake pattern. It brought a bit of elegance to our rustic glam theme this year and will always work as our themes change.  How fantastic do they look??


After getting the stockings, it was time to conquer the other problem we were having. The dreaded TV over the mantle. I had been brainstorming all sorts of options and knew that it needed to be easily removable for the practicality of actually using the TV. I used plastic wreath hangers, tag board and a large chalkboard printable from Caravan Shoppe.


What do you think? I will share more details at a later time of how the DIY project came to life. Lets just say this one was even husband approved.


So, now that my two items have been checked off of my list, I can just sit back and relax... just kidding! We still have a ton of festivities and parties to plan for at our house over the next two weeks. What is on your Christmas list this year?


Stop by this week to see our Christmas card, Christmas card display and the rest of the home tour.

Friday, December 12, 2014

DIY Christmas Pillow


Hi All! I just wanted to stop by with a quick DIY project for Christmas. I started this project after seeing a christmas tree fabric pillow on Pinterest. I immediately thought I can make that. So i got out my trusty Ikea canvas pillow case and craft paint and began to plan. Here are the supplies needed. Two colors of fabric paint, pencil and a handmade stencil. For the stencil I copied a picture from online and then transferred on to cardboard.  I wanted each tree to be similar, but not exact or perfect.


Then I started by laying out the trees and tracing them. Again i didn't want them to be perfect I wanted a little randomness to the pattern.


After they were all traced I used a thin paint brush to outline and paint the insides of the trees black. Once I finished with the trees and let them dry I added a gold border using paint and following the stitch line on the outside of the pillow. 


What do you all think? I love to paint and can't wait for new pillow painting inspiration. Be sure to stop by next week for some more Christmas updates and a Christmas home tour.


Saturday, December 6, 2014

Oh Christmas Tree! Oh Christmas Tree!

So the tree is up and I am loving it! In the past i have gone with silver, white and an icy blue. However I decided to switch it up this year and go for more of a rustic glam. Think glitter, glass metallics with burlap and natural elements.


I was able to use a lot o the same elements, white poinsettias and metallic pheasant feathers but I chose to switch up the ribbon to a burlap and metallic ribbon and I added in large pine cones and a few birch balls. A trick that I tried out this year that really made a difference was to use two types of lights. I first wove small little lights in the center of the tree and wrapped my larger bulbed lights more around the edge. It made a huge difference and really haloed add sparkle to the tree.


Have I mentioned this is my favorite time of year? I absolutely love sitting at night and looking at the tree! What themes did you all go with this year?


Sunday, November 16, 2014

It's beginning to look a lot like Christmas!

Ok, so I jumped on the early Christmas decorating bandwagon. In the past I never decorated until the day after Thanksgiving. This is the day my whole family gets together and cuts down our trees. This year I decided to start early and here is why. One, I LOVE Christmas and never feel like I get to enjoy my decorations long enough. Two, I figured I can pick at them a little at a time.  However, the tree will not go up until after Thanksgiving so I feel like it will still be special.  This is a somewhat new addition this year.

The new addition piece is the chalkboard printable. I ordered a number of these downloadable Christmas printables from the Caravan Shoppe. Their whole pack is $12 and includes a ton of great stuff! You can find their Christmas pack here. You just need to bring the files to your local Office Max and ask them to print them on their contractor printer (where they print blue prints for contractors). It only costs a few dollars. I found an old gold frame of my mothers and spray painted it white. I then am able to use it for all sorts of chalkboard printables. Easy way to decorate for Christmas on the cheap!


Have you all started for decorating for Christmas yet?

Tuesday, November 11, 2014

Gender Reveal Party


Okay, so this post is a year in the making, but with Christmas right around the corner I couldn't help but share our Christmas time Gender reveal party from last year.  We were so excited to find out the gender of our baby and couldn't wait to share the news with our family.  Here we are before heading to the ultrasound and our prediction!

 We had the ultrasound on a Thursday morning and then we had to wait 9 torturous hours to share the news.  I am not going to lie I had no idea how hard keeping that secret would be.  I tried to avoid people most of the day, but eventually met up with my mom so we could run a few errands for the party and it was so hard, but I just kept referring to her as the baby.  I think it helped that I thought it was a boy for so long and was calling the baby a him for weeks before. On to the big reveal.  I searched Pinterest for options and found a number of fun ones, balloons in a box, silly string, cakes. However, I never found one that felt quite right.  So, I started brain storming ideas that would involve the season, Christmas!! I decided to decorate a second Christmas tree with both pink and blue ornaments and lights.  I was absolutely in love with what I like to refer to as the baby tree.


Every morning I would just head downstairs, plug it in and enjoy my breakfast, so happy!   Back to the game plan. We plugged in both set of lights to plug ins that had a remote control for it.  We turned off the tree, counted to three and turned on just the pink lights (we also had the white lights as well since the tree was pre lit).


As an added bonus I ordered these amazing flutter feti sticks for my nieces and nephews so they could join in on the action. It was so fun for them and made for a large pink explosion. SOOOOO FUN!!  You can get the flutter feti sticks HERE.  I absolutely love all of the pictures from the event. You can see reactions of others and the smiles on their faces.  The hubbys family is all boys so it was exceptionally exciting for all of them.  For the party I decided to keep decorations simple since the house was already decorated for Christmas, but I added a few fun things.


First, I made these little mustaches and lips on a stick for guests to make their vote.  Very easy to do I just printed a picture of a mustache and lips, cut them out and used fabric glue to attach the sticks to the back.  I bought pre dipped white chocolate oreos and drizzled half with blue and half with pink candy melts.

I also had a custom chalkboard sign made by Whimsical Stationery.


The cake is of course from the very talented Cakes by Gail.  It turned out so adorable, she never disappoints.

Water bottle labels were from Fine Dandy Printables and they have a ton of matching items if you need them.

The extra large balloons came from the wonderful Tom Kat Studios and I loved how they added to the party and made for fun pictures once the gender was revealed.  Okay, that was a long one.  This may have been my favorite party of all time. Only because it combined both our friends and our family and of course our little peanut!!  It felt like such a loving, fun and exciting time.  We are so blessed by each and every person that attended!!!

What are some of the ways you have shared gender with family and friends?

Wednesday, October 22, 2014

Baby Dedication

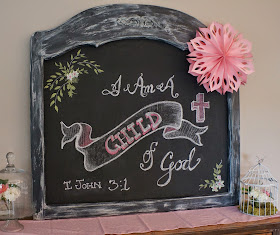
On August 17th Grace was dedicated to the Lord! It was a beautiful day filled with faith, family and friends. After church we had everyone back to our house for a light lunch. I wanted to keep things pretty simple and I was able to bring out a lot of items I had used for showers in the past. I went with light pink and white with a few accents of burlap.

My mother-in-law created this amazing chalk board sign. She is so talented! I can't wait to share some of the future signs we have dreamed up for this chalk board.


The beautiful cake is by the ever so talented Gail's Cakes of Minneapolis it was a delicious white cake with raspberry filling. The rhinestone cake topper is from Diamond Party Confetti it was just the perfect amount of bling needed.


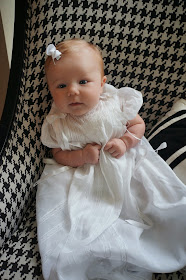
Many of the flowers were picked from the yard including the white hydrangeas, strawberry vanilla hydrangeas which I combined with store bought pale pink roses and the most amazing gladiolus. Because I couldn't share this post with out a few pics of the girl of the hour here she is in her family Christening gown and then in her monogrammed dress she changed into when we got home.  A girl needs an outfit change for a party. Have I mentioned I love things that are monogrammed, including little girls clothes!


We feel so blessed to have been able to celebrate this very special day with our family and friends. Like I always say the decorations can make things pretty, but it is the people that make the party!


Sunday, September 21, 2014

Hello Again!

Hello everyone! I have been gone for awhile, but thought I would come back and say hello.  My baby girl was born on May 20th and we couldn't be more in love. I thought today I would share her monthly photo project. Each month I am taking a number of pictures and making a collage on Ribbet. If you haven't used this online photo editor you should definitely check it out. It is really easy to use and has a ton of options. So without further adieu here are her first 4 months worth of photos.

Month 1


Month 2


Month 3


Month 4


I will be back soon with a few new parties I have had as well as some fun home updates :)

Monday, April 21, 2014

LaLou Boutique


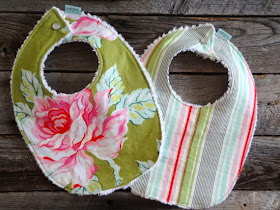
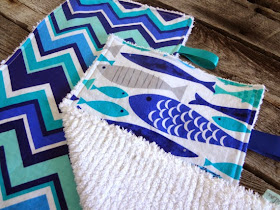
I am so excited to write this blog as I am so proud of my very talented friend Lacey!  Lacey is so creative and is the one that encouraged me to start writing this blog. About 6 months ago she decided to open an Etsy shop called LaLou Boutique and sell all of her amazing creations! She has been sewing baby blankets, onesies and bibs for all of our friends for quite some time and her Etsy shop was the perfect extension of that.  So without further ado I will show you just a few of my favorite items in her shop.

The first is the perfect gender neutral gift. I mean wouldn't this be adorable on either boy or girl?

A whole assortment of amazing black and white burp cloths


 I want to have twins just so they can wear these adorable onesies.

 This is honestly the softest blanket and would be the sweetest baby gift for any boy or girl!

 This is my favorite fabric in her shop and she even made me a coordinating blanket for my shower. Did I mention that she does custom pieces??


 Isn't this adorable?

My best friend had a hungry caterpillar 1st birthday party and she wore this onesie and bib and it was so adorable.  The outfit and the party!!

 Lastly isn't this patter so fun? I love the coordinating fabrics.

So that is just a small sampling of her shop, but as you can see she makes beautiful things out of wonderful graphic fabrics. Make sure to stop by La Lou Boutique for your next baby shower! Lacey I am so proud of you are such ana mazing friend and a wonderful talent!!!